Introduction to Ghost Cookies
What are Ghost Cookies and Why They’re Perfect for You?
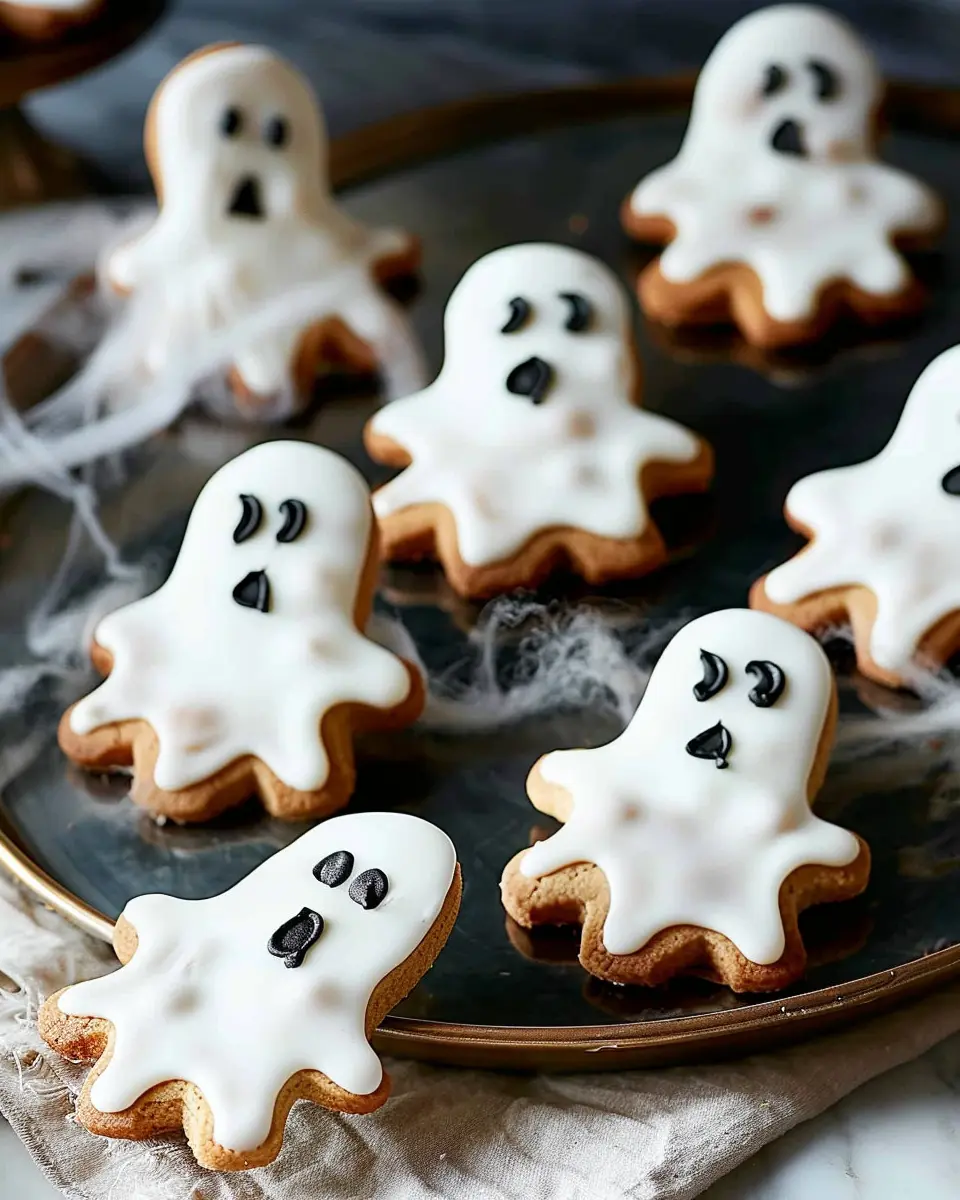
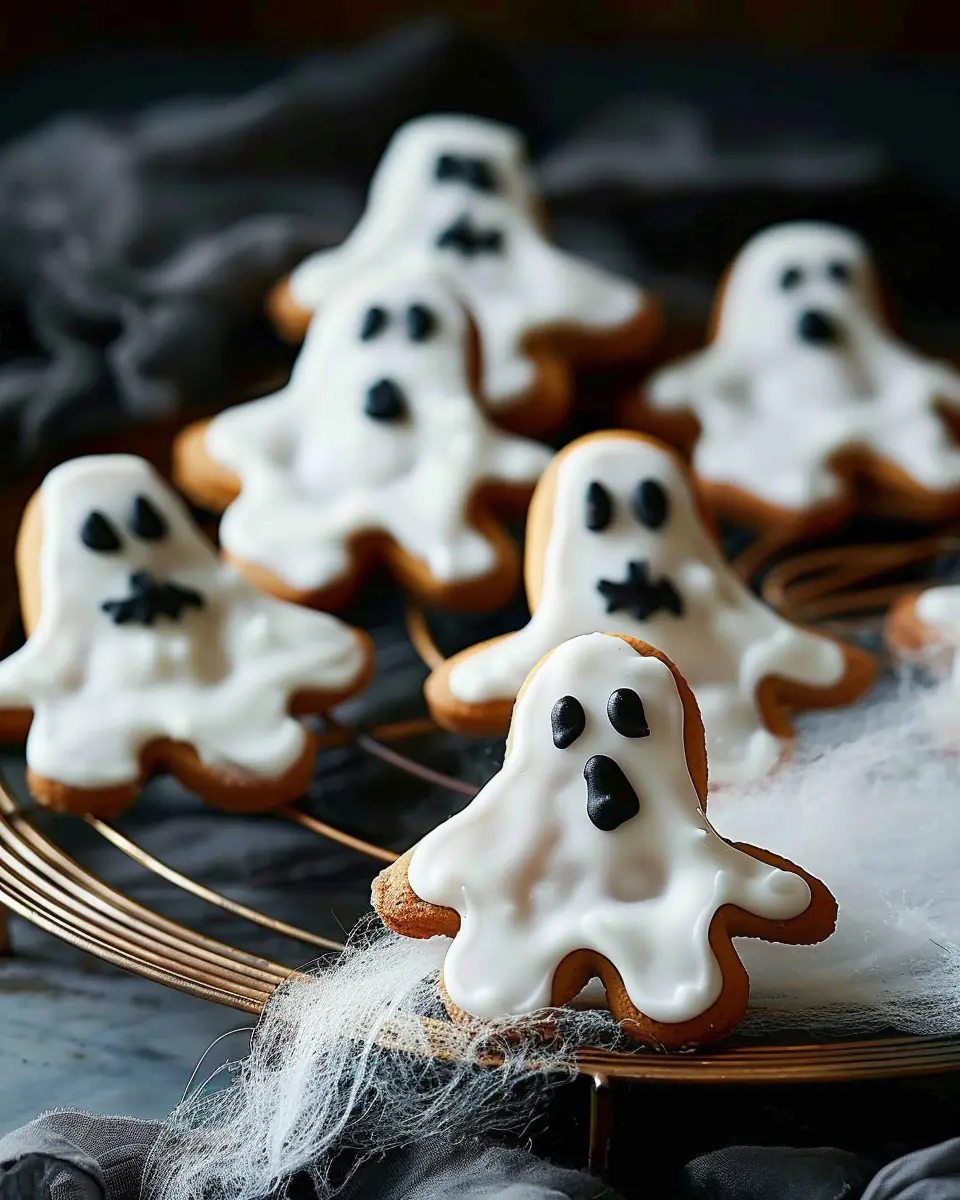
Have you ever found a way to make your dessert table just a little more whimsical? Enter ghost cookies, a delightful treat that not only satisfies your sweet tooth but also brings a playful spirit to your gathering. Celebrating Halloween, a themed party, or simply a cozy night in? These cookies fit right in!
Ghost cookies are essentially sugar cookies shaped like little ghosts, adorned with icing to give them a spooky yet adorable look. They’re perfect for a variety of occasions, from festive gatherings to casual get-togethers. But what makes them stand out? Well, here are a few reasons you should whip up a batch:
- Easy to Make: The ingredients are simple and usually things you already have at home, like flour, sugar, and butter. Plus, the cookie dough is flexible enough to mold, allowing you to enjoy the fun of decorating.
- Customizable: You can personalize these ghostly treats to match your taste—whether you prefer white chocolate drizzle, colorful sprinkles, or even a dash of edible glitter. Your imagination can run wild!
- Instagram-Worthy: In today’s age of social media, who doesn’t love a photo-ready dessert? The charming design of ghost cookies makes them prime candidates for showing off your baking prowess on Instagram or other platforms.
With Halloween around the corner or perhaps a friendly get-together, you’ll want to look into how you can nail that festive spirit. As a seasoned baker, I remember making these treats with friends, laughing all the while as we attempted to perfect our ghostly design. There’s something inherently joyful about creating food that brings smiles—both from the taste and the appearance.
If you’re unsure where to begin, food blogs like Sally’s Baking Addiction offer creative inspiration for cookie ideas, while baking sites like King Arthur Baking provide detailed guidelines on perfecting your cookie dough. Check them out when you’re ready to dive into the sweet world of ghost cookies!
Ingredients for Ghost Cookies
When you’re diving into the fun of baking ghost cookies, gathering the right ingredients is essential for bringing these adorable treats to life. You’ll need a blend of sweet and spooky ingredients to create cookies that are as delightful to eat as they are to look at. Here’s what you’ll want to have on hand:
- 1 cup of all-purpose flour – This will be the base of your cookies, giving them structure.
- 1/2 teaspoon of baking soda – To help the cookies rise and achieve that perfect texture.
- 1/4 teaspoon of salt – Essential for balancing flavors.
- 1/2 cup of unsalted butter, softened – For a rich and creamy flavor, always choose quality butter.
- 1/2 cup of granulated sugar – Sweetness is key!
- 1/4 cup of brown sugar – For a hint of molasses and deeper caramel flavor.
- 1 large egg – Brings the mixture together and helps the cookies hold their shape.
- 1 teaspoon of vanilla extract – Adds a lovely aroma and taste.
- 1 cup of white chocolate chips – These will be used to create the ghostly faces.
- Decorative icing – Get creative with your ghost cookies by using icing for eyes and mouths!
With these staple ingredients, you’ll be well on your way to baking a batch of festive ghost cookies that everyone will love. For some great decorating tips, check out this fun icing guide, which offers plenty of inspiration. Remember, the best ingredient is always a pinch of creativity!
Preparing Ghost Cookies
Step 1: Gather Your Ingredients
To whip up these delightful ghost cookies, you’ll need to assemble your ingredients first. Here’s what you’ll require:
-
For the cookies:
-
2 cups all-purpose flour
-
1/2 teaspoon baking powder
-
1/2 teaspoon salt
-
3/4 cup unsalted butter, softened
-
1 cup granulated sugar
-
1 large egg
-
1 teaspoon vanilla extract
-
For the icing:
-
2 cups powdered sugar
-
2 tablespoons meringue powder
-
1/3 cup water
-
Black food coloring (for decoration)
-
For the ghost toppings:
-
Large marshmallows (the fluffier, the better)
-
Writing icing in black (store-bought or homemade)
Getting all these ingredients together not only speeds up your cooking process but also gets you in the mood for creating these fun treats. You can find excellent quality ingredients online or at your local grocery stores. Culinary websites often offer insights on selecting the freshest ingredients for the best baking experience.
Step 2: Make the Icing
Creating the icing is an essential step in bringing your ghost cookies to life. In a mixing bowl, combine the powdered sugar and meringue powder. Gradually add the water until the mixture achieves a soft, spreadable consistency. It’s really important to beat the icing well – not only does this incorporate air but ensures it stays smooth when you pipe it later. If you’re ambitious, you can even color part of the icing with black food coloring to create spooky little faces on your ghostly creations.
Do keep in mind that this type of royal icing can harden quickly, so cover it with a damp cloth if you take breaks in between your activities.
Step 3: Secure the Marshmallow Ghosts
Let’s face it, the marshmallow ghosts are what makes these cookies so adorable! Once your cookies are baked and cooled, it’s time to secure the marshmallow treats on top. Use a small dollop of icing as glue – apply it to the center of each cookie and gently press a marshmallow, rounded side up, on top. This little step really makes a difference, both aesthetically and in flavor!
Step 4: Ice the Ghosts
Now comes the fun part! Grab your icing and start covering those marshmallow ghosts. Use a spatula or a butter knife to create a smooth, ghostly coat over the marshmallow. Don’t be shy with the icing; it will help define the ghost shape. You can let it drip over the edges for a more whimsical look that resembles a ghost floating over your cookie.
Set the iced cookies aside to let the icing dry a little – this will make your decorating jobs easier later.
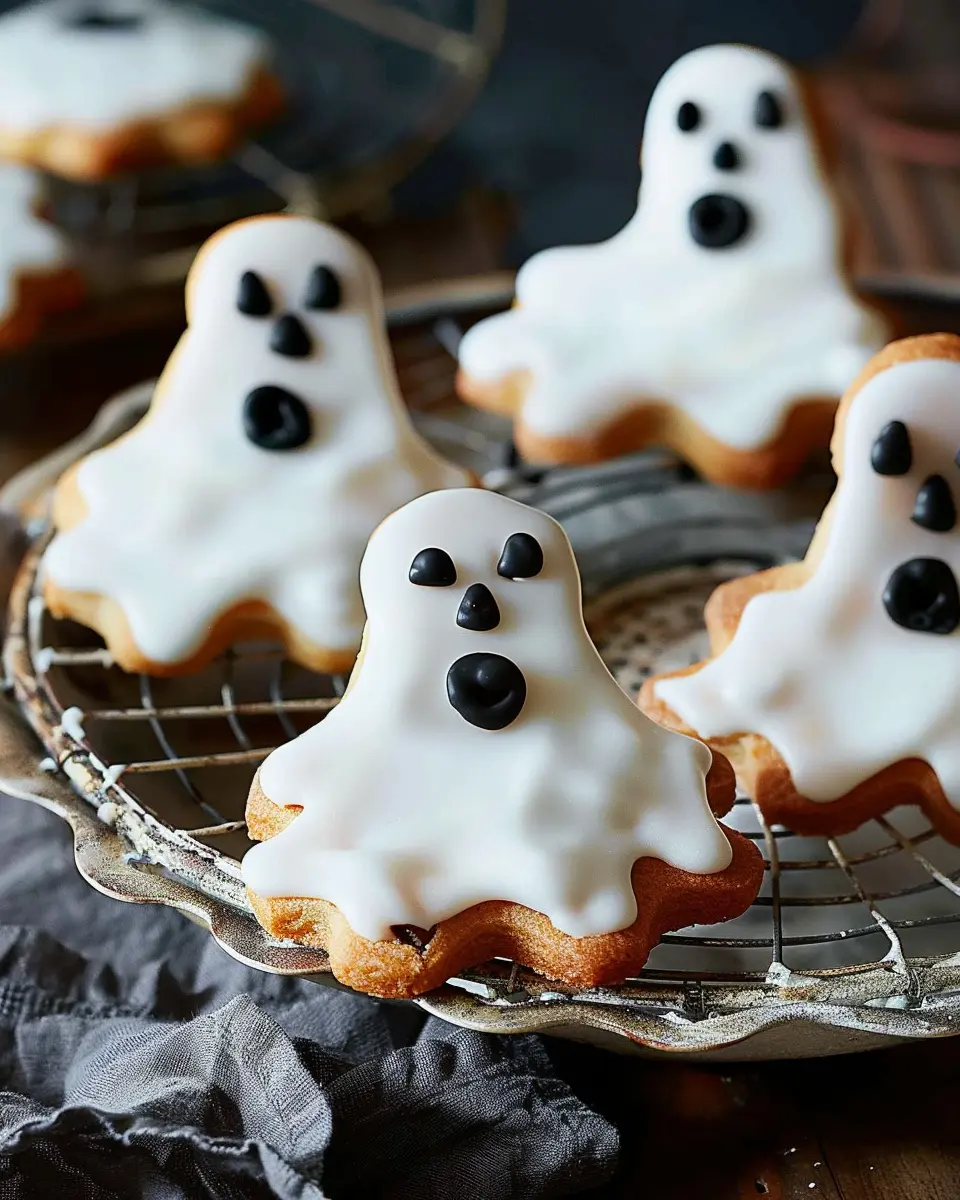
Step 5: Decorate with Writing Icing
Once your icing has set, it’s time for the finishing touches. Use your black writing icing to pipe on eyes and a little mouth for each ghost. You can even create varied expressions to personalize your cookies. Perhaps some are spooky, while others are funny! This step brings out the creativity in you, allowing you to design your ghostly friends however you choose.
Don’t worry if your piping isn’t as neat as you hoped. It’s all about having fun with it! From my own experience, I’ll add – the more unique the designs, the more your friends will admire your handiwork.
Enjoy your baking adventure with these ghost cookies because nothing says festive like tasty treats with a dash of creativity!
Variations on Ghost Cookies
When it comes to ghost cookies, the classic recipe is just the start! Get creative with these delightful variations that cater to different tastes and dietary preferences.
Chocolate Ghost Cookies
If you’re a chocolate lover, you’ll appreciate these chocolate ghost cookies. Start with your favorite chocolate cookie base, then fold in chocolate chips for a richer, more decadent treat. You can even make a double chocolate version by incorporating cocoa powder into the dough. Once you’ve baked your cookies, top them with a smooth and creamy white chocolate glaze to create that signature ghostly appearance. The contrast of flavors and textures in each bite is simply irresistible!
- Use dark chocolate chips for a richer flavor.
- Sprinkle some sea salt on top of the white chocolate for an added flavor kick.
- For an extra spooky touch, add mini chocolate chip eyes to your ghosts for a fun twist.
Vegan Ghost Cookies
Looking to whip up some ghost cookies that everyone can enjoy? Try these vegan-friendly versions! Substitute the eggs in your recipe with flaxseed meal or applesauce, and use a dairy-free butter or coconut oil. Replace regular chocolate chips with dairy-free ones for a deliciously vegan-friendly treat.
Consider adding a pinch of cinnamon or nutmeg for that warm flavor profile that brings everything together. The best part? These cookies are just as delightful as their traditional counterparts, proving that being plant-based doesn’t mean sacrificing flavor.
- Explore using almond flour for a nutty taste and different texture.
- Try organic cane sugar for a more wholesome sweetener.
- Create spooky designs with vegan frosting or melted dark chocolate.
No matter your choice, these variations on ghost cookies are sure to delight at any gathering! For more tips on creative cookie-making, consider checking out resources like Serious Eats or Minimalist Baker. Happy baking!
Baking Tips and Notes for Ghost Cookies
Choosing the Right Cookies
When making ghost cookies, you want a sturdy base that holds its shape while baking. Opt for sugar cookies or shortbread; both are fantastic choices that provide a perfect canvas for your spooky designs. If you’re feeling adventurous, consider experimenting with flavored doughs like vanilla or almond for a delightful twist!
Icing Consistency Tips
A crucial element in decorating your ghost cookies is the icing consistency. You want it to be thick enough to hold its shape yet fluid enough to spread smoothly. Aim for a toothpaste-like texture for outlining and a slightly thinner consistency—akin to pancake batter—for flooding. If your icing is too runny, add a bit more powdered sugar, and if it’s too thick, just a splash of water will do the trick. Remember, practice makes perfect, so don’t hesitate to create a few test cookies!
To learn more about cookie decorating, check out Bake from Scratch, where you can find fantastic tips and tricks from experts. Happy baking!

Serving Suggestions for Ghost Cookies
Perfect Pairings with Warm Beverages
What’s better than enjoying your delightful ghost cookies with a cozy beverage? Imagine a warm mug of spiced cider or a rich cup of hot cocoa. This combination not only elevates the flavors but also adds to the seasonal vibe. You can even get creative by adding marshmallows or whipped cream to your drink! For those looking to stay on the healthier side, a comforting chai latte with hints of cardamom and cinnamon pairs beautifully and provides a spiced kick that complements the sweetness of your cookies. If you’re hosting a gathering, consider creating a hot beverage bar for your guests, allowing them to customize their drinks.
Creative Ways to Present Your Ghost Cookies
Presentation is key when it comes to your ghost cookies. Why not arrange them on a spooky-themed platter? You could use black and orange decorations to create the perfect Halloween atmosphere. For an enchanting touch, consider wrapping individual cookies in clear cellophane, tied with themed ribbons, to give as treats. Or place them in a charming wicker basket and line it with colorful tissue paper to showcase your delicious creations. It’s all about making that first impression—after all, we eat with our eyes first!
For more tips on stylish food presentation, check out resources from food styling experts at The Kitchn.
Time Breakdown for Ghost Cookies
When you’re gearing up to make ghost cookies, it’s important to plan your time effectively for a spook-tacular baking experience! Here’s a quick rundown to help you organize your schedule:
Preparation Time
Get ready to unleash your inner baker! The preparation of the dough and assembling your ghost cookies usually takes about 20-30 minutes. This includes mixing your ingredients and rolling out the dough. Pro tip: have all your ingredients measured and ready to go for a smooth process.
Setting Time
Once you’ve cut out your adorable ghost shapes, allow them to set. This typically takes around 30 minutes in the fridge. Chilling the dough not only helps the cookies maintain their shape but also enhances the flavor.
Total Time
In total, you’re looking at about 1 hour to whip up a batch of these delightful ghost cookies, including preparation and setting time. Perfect for a last-minute Halloween treat or a fun baking session with friends! So gather your supplies, crank up your favorite tunes, and let the cookie magic happen!
For more tips on achieving the best results, check out this expert baking guide. Happy baking!
Nutritional Facts for Ghost Cookies
When it comes to indulging in treaty delights like ghost cookies, it’s important to be aware of their nutritional aspects. Here’s a quick look at what you can expect.
Calories
A serving of ghost cookies typically contains around 150 calories. While a little treat is fine, being mindful of your portion can help keep your overall caloric intake balanced for the day.
Sugar Content
These festive cookies can be pretty sweet! On average, you’ll find about 10 grams of sugar per serving. If you’re watching your sugar consumption, consider using alternatives like natural sweeteners or reducing the amount used in the recipe.
Fats
Ghost cookies generally contain about 6 grams of fat per cookie, depending on the specific ingredients. This can vary if you opt for substitutions like using unsaturated oils instead of butter. For a healthier twist, you might even experiment with adding in ingredients like nuts or seeds.
With the holiday season approaching, ghost cookies are a fun and delicious way to add some whimsy to your dessert table while keeping an eye on nutritional value. For more tips on managing your treats, check out Healthline for expert advice. Live a little, enjoy your ghost cookies, but enjoy them wisely!
FAQs about Ghost Cookies
Can I make Ghost Cookies ahead of time?
Absolutely! You can prepare Ghost Cookies ahead of time, which makes them perfect for parties or gatherings. Once you’ve baked and decorated them, simply let them cool completely. Then, place them in an airtight container at room temperature. If you want to keep them fresh for a longer period, you can freeze them. Just remember to wait until they’re fully thawed to enjoy!
How do I store leftover Ghost Cookies?
Storing leftover Ghost Cookies is straightforward. Keep them in an airtight container to maintain their freshness. If you’ve used perishable decorations, such as cream cheese icing, make sure to refrigerate them. For durable options, like royal icing, they can stay out on your countertop—just be sure they’re in a cool, dry place! If you’re curious about the best practices for storing cookies, the Kansas State University’s article on cookie storage can provide excellent tips.
What other decorations can I use besides writing icing?
While writing icing is a classic choice for decorating your Ghost Cookies, don’t hesitate to get creative! Here are some fun alternatives:
- Fondant: Easy to mold into shapes for different ghost expressions.
- Chocolate Drizzle: Adds a delightful richness and can create “ghostly” effects.
- Colored Sprinkles: Use them for a whimsical touch—eyeballs or colored sugar can bring your ghosts to life.
- Edible Markers: Great for writing short phrases or doodles on your cookies.
Experimenting with these options can really enhance the look of your Ghost Cookies, making them a hit at any Halloween celebration!
Conclusion on Ghost Cookies
Why You’ll Love Making Ghost Cookies
Making ghost cookies is not just about enjoying a delicious treat; it’s about creativity and connection. Here’s why they’re a must-try:
- Fun for Everyone: Ghost cookies elevate any gathering, turning baking into a shared experience. Invite friends over and enjoy some laughs while decorating!
- Easy and Quick: Even if you’re short on time, ghost cookies come together swiftly, making them perfect for busy evenings.
- Perfect for Any Occasion: Halloween isn’t the only time for spookiness; these cookies can add some playful spirit year-round.
So, roll up your sleeves, grab your ingredients, and get ready for a delightful baking adventure! For more tips on festive treats, check out Food Network or Martha Stewart’s recipes for inspiration!
PrintGhost cookies: Easy, Irresistibly Spooky Treats for All Ages
These ghost cookies are not only fun to make but also delicious and perfect for any spooky occasion.
- Prep Time: 15 minutes
- Cook Time: 12 minutes
- Total Time: 27 minutes
- Yield: 24 cookies
- Category: Desserts
- Method: Baking
- Cuisine: American
- Diet: Vegetarian
Ingredients
- 1 cup unsalted butter
- 2 cups granulated sugar
- 4 cups all-purpose flour
- 2 teaspoons baking powder
- 1 teaspoon salt
- 2 large eggs
- 2 teaspoons vanilla extract
- 1 cup white chocolate chips
Instructions
- Preheat the oven to 350°F (175°C).
- In a bowl, cream together the butter and sugar until fluffy.
- Add the eggs and vanilla, mixing well.
- In another bowl, combine flour, baking powder, and salt; gradually add to the creamed mixture.
- Stir in white chocolate chips.
- Drop dough by rounded tablespoons onto ungreased baking sheets.
- Bake for 10-12 minutes or until edges are lightly golden.
- Let cool before decorating to resemble ghosts.
Notes
- Use food coloring to tint the icing for decorating.
- Decorate with chocolate drops for eyes.
Nutrition
- Serving Size: 1 cookie
- Calories: 200
- Sugar: 12g
- Sodium: 150mg
- Fat: 10g
- Saturated Fat: 5g
- Unsaturated Fat: 3g
- Trans Fat: 0g
- Carbohydrates: 25g
- Fiber: 1g
- Protein: 2g
- Cholesterol: 30mg